The problem is, any games that use the pointer need the sensor bar set up. With my projector that means having the Wii in the middle of the room and balancing the sensor bar on a chair so all the wires reach, no good at all.
In this post I'll write about how I built a sensor bar "projector" to overcome these problems without having to fix anything permanently to the wall.

The theory is, the sensor bar contains two points of infra-red light that are fixed in space, the ir-camera in the wiimote can track those points and work out where it's aiming.
I saw a project by spritetm that used power leds and lenses to project two ir spots onto the wall. I thought this was a great idea, and since I already had the parts I'd need, I decided to make my own version.
Sprite used a large fresnel lens and collimating optics to projects his ir spots, I didn't have a fresnel and it would take up too much room anyway, so I used some aspheric lenses that I already had.


The Osram Golden Dragon leds I used need to be kept cool. They have a thermal pad on the bottom for that purpose. I soldered the pad to some copper offcuts, then screwed it to an aluminium heatsink.

Because the thermal pad is connected to the anode, I soldered the leads first, before attaching the heatsink so there was less thermal mass and the soldering time could be kept minimal to prevent heat damage.

To power my leds, I used a constant-current led driver, it's a switch-mode design and delivers 970mA to the leds. Since it would need an external power supply I used the old sensor bar wire to signal the circuit to switch on/off with the Wii, and put it all into an old case I had laying around.

Now I had the power sorted out I needed to make something to hold everything in place. I used some sheet styrene to make a frame for the lens to sit in.

I cut the plastic with a stanley knife and glued it together in layers with polystyrene cement until I had something that would hold the lens nicely.
Lastly, I finished off the rest of the led mount with some M3 screws that would allow for fine focus adjustments and fitted everything together.

I could now dial-in the focus. I knew my lenses had a focal length of 26mm, so the leds needed to be fixed approximately 26mm from the the flat side of the lens and then further adjusted for proper focus.

I used an ir-modded web-cam with the exposure stepped down and the Wii's sensitivity settings, to very precisely adjust the leds and find the exact focal point for good, strong IR spots on my wall.
 |
| An IR image of the led projection on my wall 4m away |
You can see the intense square-ish image of the die itself in the middle, along with details of the two bond wires in the halo. The spot is around 15cm across at 4m, and the Wii needed to be set at 4 or 5 sensitivity to detect it reliably.
 |
| in perfect focus |
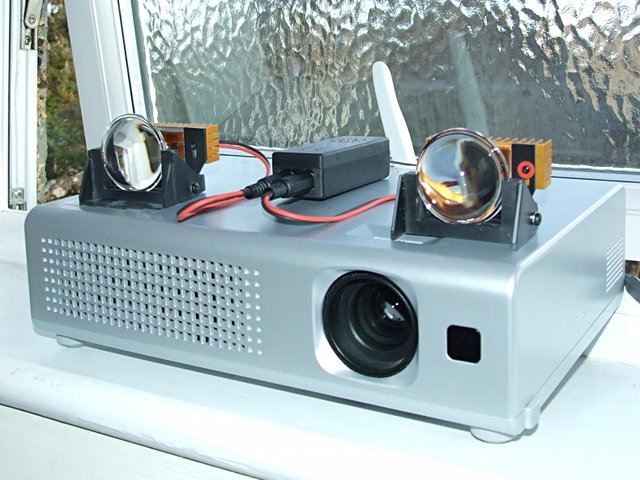
Everything sits neatly on top of my projector and I have the spots aimed at the sides of the screen about a third of the way from the top and it works perfectly.
In fact it's better than on my tv, because the pointer's now centred on the screen rather than offset by having the sensor bar underneath.


Wow!!! that's really cool!!!
ReplyDeleteTry this, its what worked for my sensor http://howtofixstuff.blogspot.ca/2013/08/how-to-fix-wii-sensor-bar.html
ReplyDeleteDo you have exact part numbers and a distributor for the lenses?
ReplyDeletenice
ReplyDeleteNeat man it looks super cool
ReplyDeleteProjectors dealer in chennai